
Halloween Chocolate & Orange Checkerboard Cake
Double, double toil & trouble;
Fire burn & cauldron bubble. It’s that time over year which you either love or loathe, children get high on sugar, adults revert to the childhood joys of dressing up & teenagers lazily wear masks in the hope of obtaining anything for free… it can only be Halloween.

Personally, I love anything & everything novelty, tatty or cheesy so Halloween is the perfect amalgamation of each (& the one time of year where it is truly acceptable to like the all of the above). As a child, Halloween entailed capes made of bin bags, rubber noses held in place with cheap elastic, witches hats & fake blood all in the hope of being so finely & scarily dressed that strangers would willingly give us sweets for our efforts. For the most part it worked with the exception of the odd box of raisins & profanity (you know who you are).

In my adult years, Halloween has evolved to include the creative carving of pumpkins, novelty bakes & raiding my storecupboard for all of the sweets lurking around that I no longer have any desire to eat in order to palm them off on unsuspecting trick or treaters (take heed raisin givers).

Autumn as a whole is one of my favourite seasons for baking, as the nights draw in quicker & a chill returns to the air, there’s no better comfort than indulging in a little baking (not only do you get to eat treats but it also warms the house!). It’s the time of year when we all start entering hibernation mode… slippers are dug out of the cupboard, blankets & candles adorn every room & hot beverages become a necessity.

Each year I look forward to a bit of experimental baking, dreaming up grand, elaborate, gory bakes (the cheesier the better!), along with new & different ways to use up leftover pumpkin innards, from cake to muffins. This has led to things such as gravestone brownies, eyeball dough balls & blood cupcakes. This year however, I bring you a true showstopper.

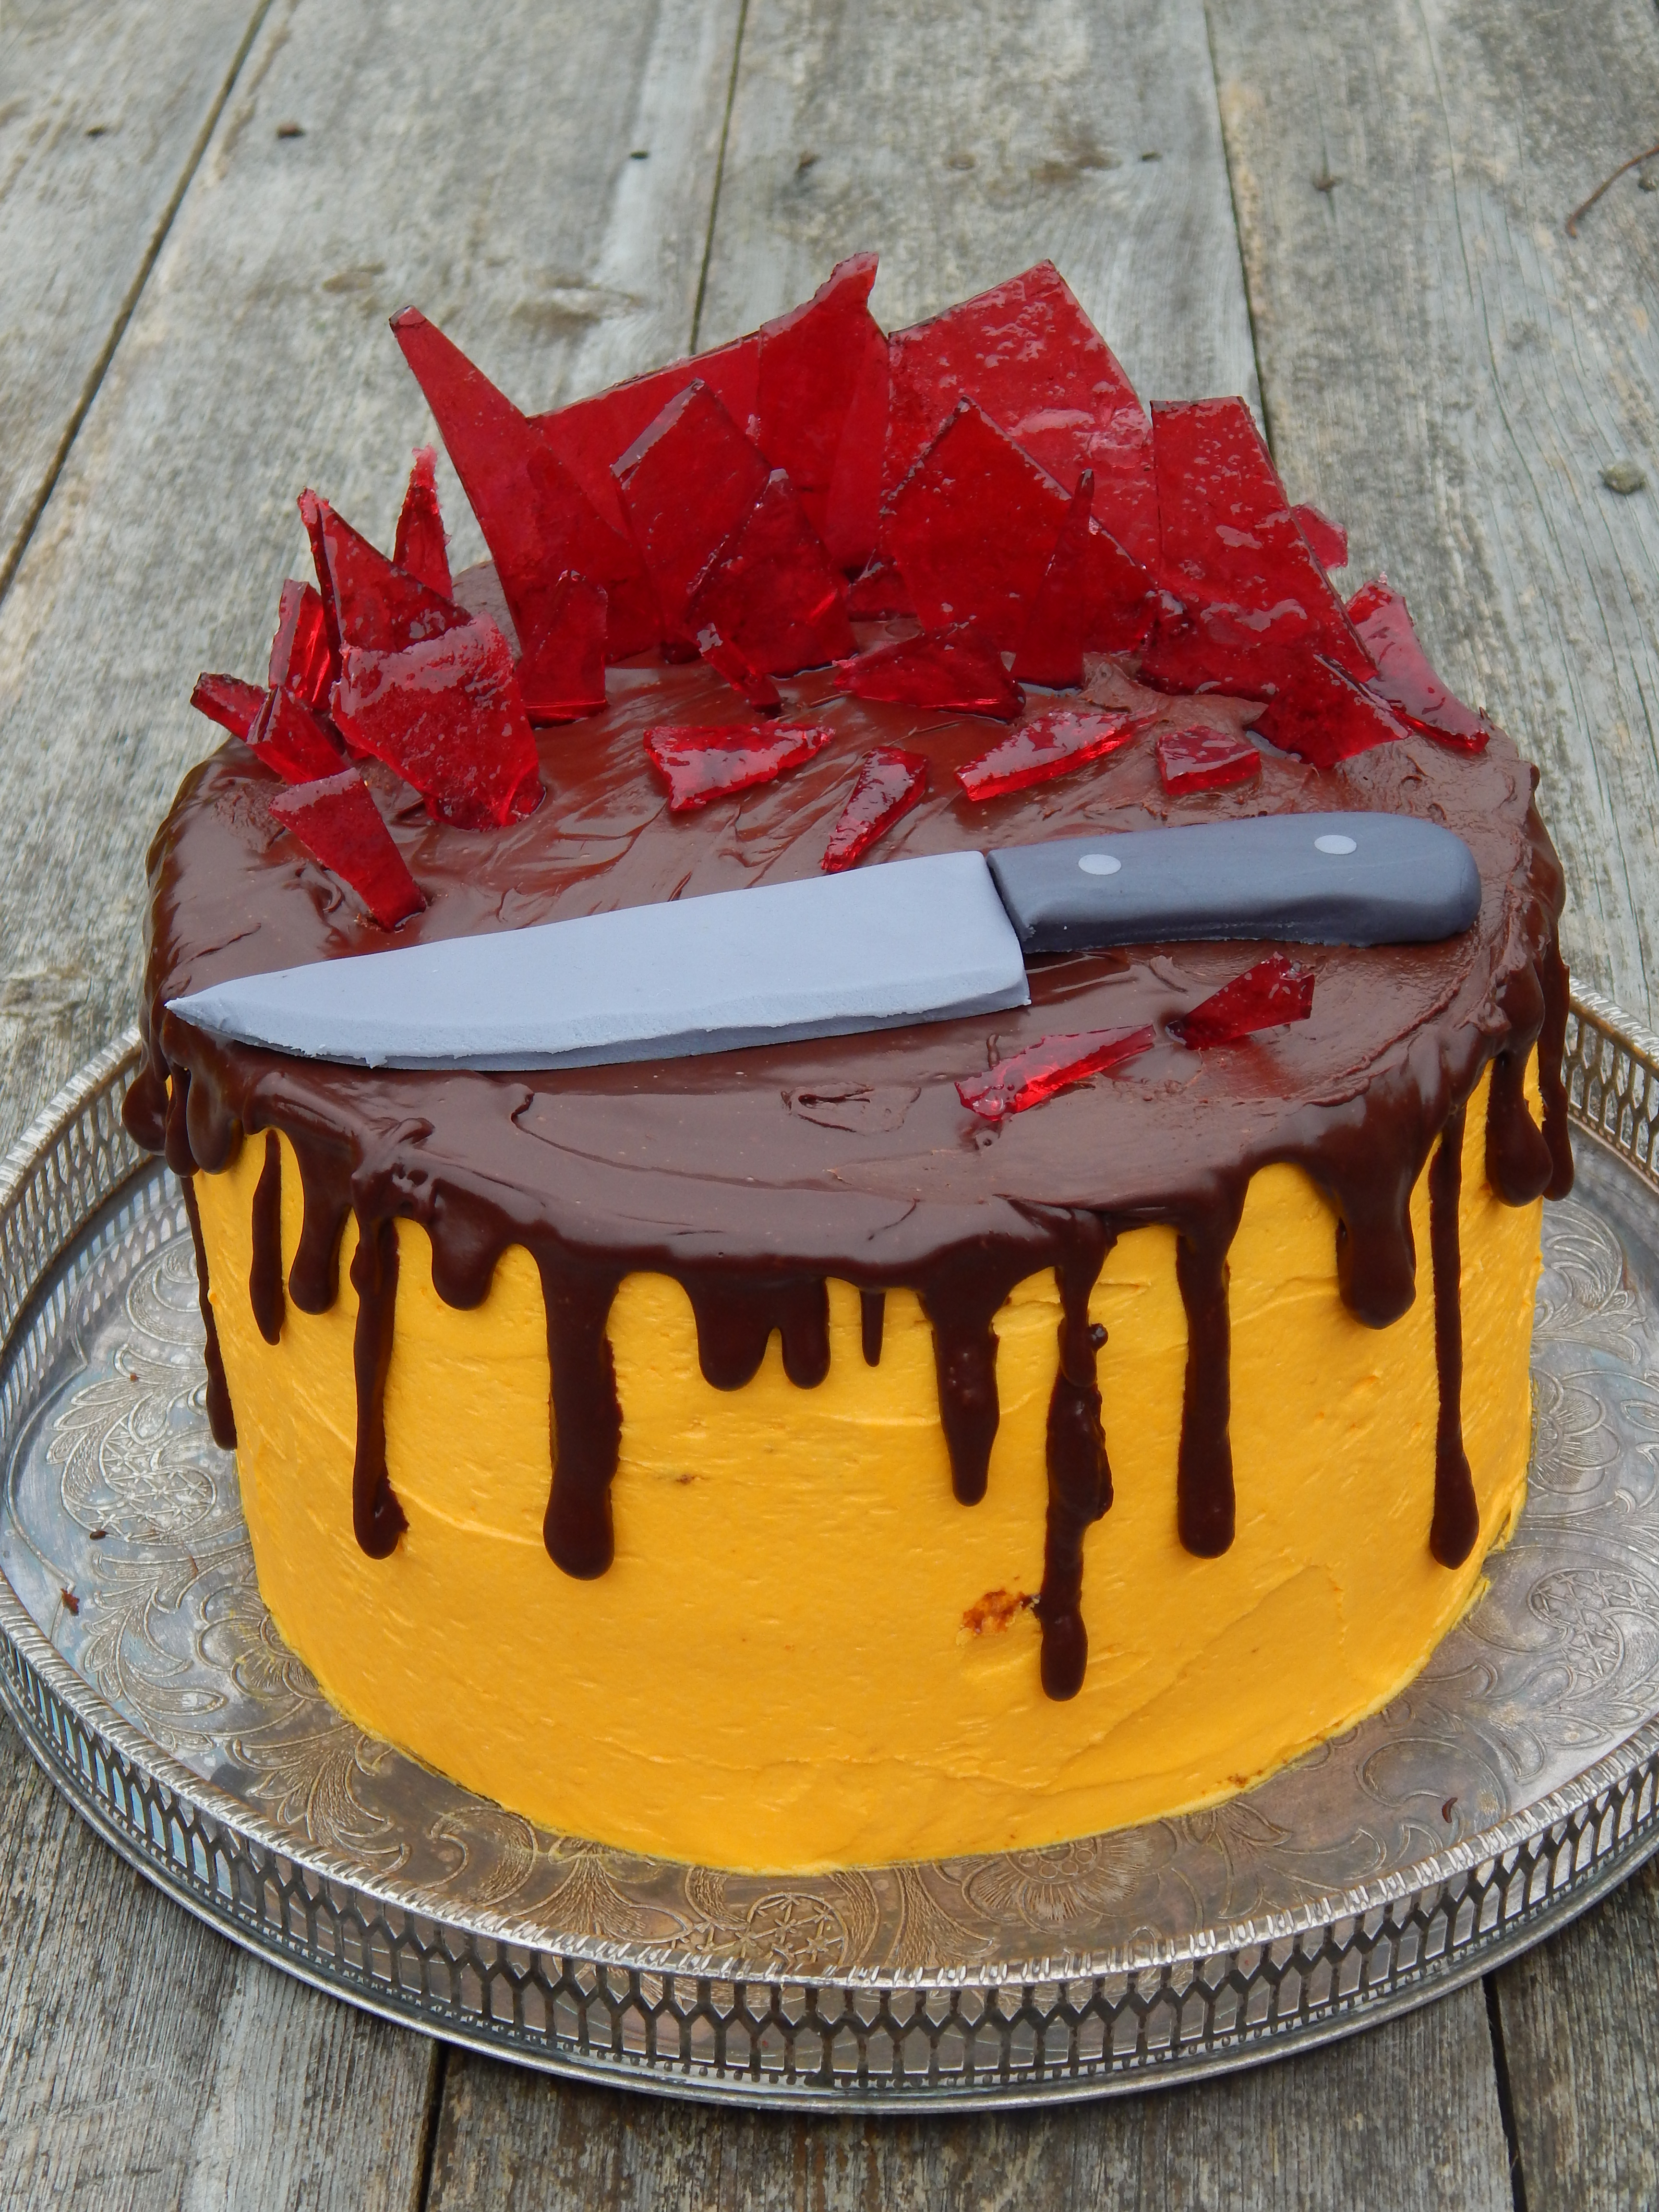
It all began with thoughts of a Halloween colour palette… the bright & dark contrasting colours attached to everything spooky. Black, the colour of darkness & death. Red, the colour of blood. Orange, the colour of pumpkins & autumn leaves. What better flavour pairing could there be to represent the colours of Halloween than chocolate & orange, that clash of deep black & bright orange that were all accustomed to? Combine these in a striking checkerboard pattern & you create a simple but impressive showstopper. Smother in an orange buttercream with contrasting dark chocolate drip to hide the surprise contained within.

I went one step further with my decoration, utilising a little bit of fondant & hard-cracked shards of caramel. My inspiration from this is my own little kitchen… imagining the gore & horror possible in the event of a kitchen accident. Thus I decided to recreate a vision that would surely put the spooks into most bakers or cooks, a sharp chopping knife & broken shards of blood-red glass (basically all the dangers of the kitchen!). A delicious but haunting Halloween cake.


Halloween Chocolate & Orange Checkerboard Cake
- Author: Katie Lewis
- Yield: 22cm cake
Ingredients
For the chocolate cakes:
- 400g plain flour
- 250g caster sugar
- 100g light muscovado sugar
- 50g cocoa powder
- 2tsp baking powder
- 1tsp bicarbonate of soda
- 3 eggs
- 1 tbsp vanilla extract
- 142ml soured cream
- 175g butter, melted
- 125ml rapeseed oil
- pinch of salt
- 300ml cold water
For the orange cakes:
- 225g butter
- 225g caster sugar
- 225g self-raising flour
- 4 eggs
- Zest of 3 oranges
- A few drops of orange food colouring
To assemble the cakes:
- 150g apricot jam
For the buttercream:
- 250g butter
- 500g icing sugar
- A few drops of orange food colouring
For the chocolate decoration:
- 75g dark chocolate
For the caramel decoration:
- 250g granulated sugar
- 225g water
- A few drops of red food colouring
For the decoration:
- 100g fondant icing
- Black food colouring
Method
- 1. Grease 4 22cm sandwich tins
- 2. To make the chocolate sponges, in a large bowl mix together the flour, sugar, cocoa powder, baking powder & bicarbonate of soda
- 3. In a jug whisk together the eggs, soured cream & vanilla
- 4. Gently melt the butter either in a small saucepan set over a low heat or in the microwave
- 5. Add the melted butter, soured cream mixture & water to the dry ingredients & beat until smooth & well combined
- 6. Divide the mixture between two greased & lined 22cm sandwich tins
- 7. Bake the sponges at 180C for 40 minutes, until a skewer inserted into the centre of the cake comes out clean when removed
- 8. Leave to cool for 10 minutes in their tins before removing & placing on a cooling rack
- 9. To make the orange sponges, in a large bowl beat together the butter & sugar
- 10. Beat the eggs into the butter mixture, one at a time
- 11. Add the orange zest to the bowl
- 12. Sift over the flour & beat until smooth & well combined
- 13. Adding one drop at a time, add enough orange food colouring to colour the mixture a bright orange colour
- 14. Divide the mixture between two greased & lined 22cm sandwich tins
- 15. Bake the sponges at 180C for 30 minutes, until a skewer inserted into the centre of the cake comes out clean when removed
- 16. Leave to cool for 10 minutes in their tins before removing & placing on a cooling rack
- 17. Whilst the cakes are cooling, make the buttercream
- 18. Place the butter into a large enough bowl & beat to soften
- 19. Add half of the icing sugar & beat until smooth
- 20. Add the remaining icing sugar & repeat
- 21. Add in a few drops of orange food colouring & beat until a bright orange colour
- 22. To make the caramel shards
- 23. Place the sugar, water & a sugar thermometer into a large heavy-set saucepan & bring the mixture to a boil
- 24. Don't stir the mixture, instead wet a pastry brush & use this to brush any sugar from the side of the pan
- 25. Once the caramel reaches 155C immediately remove from the heat, add a few drops of red food colouring & stir through
- 26. Once coloured, pour the caramel out onto a heat-resistant baking mat or a piece of baking parchment & leave to spread & set
- 27. Once the caramel has set, use a rolling pin to crack & break into different sized shards
- 28. To assemble the cake, take all 4 of the sponges & either use cookie cutters of a sharp knife & stencil to cut each sponge into 3 concentric circles
- 29. Gently warm the apricot jam in a small saucepan
- 30. Separate the circle sponges
- 31. Begin assembling the cake by taking on of the larger cake circles & brushing the inside of it with the jam
- 32. Take an opposite coloured sponge circle to slot inside of the first & brush the inside of it with the jam
- 33. Take the matching colour of the outer layer circle, pop the smallest sponge inside of the previously place sponge
- 34. Brush the tops of your assembled first layer with the apricot jam
- 35. Repeat the process, alternating the sponge colours as you build upwards & inwards until you've used all of the sponges
- 36. Once your cake has been built, cover with the buttercream & smooth the edges
- 37. Gently melt the dark chocolate either in a bowl set over a pan of boiling water or in the microwave & set aside to cool, making sure that it doesn't quite begin to set
- 38. Once cooled, use the chocolate to create a drip effect over the edges over the cake by pouring over the top & gently teasing the chocolate over the edges
- 39. Take the caramel shards & arrange on top by poking them directly into the cake
- 40. To make the fondant decoration, divide the fondant into two equal sized pieces
- 41. Add enough black food colouring to one half of fondant to colour it a black/dark grey
- 42. Add a little less black food colouring to the second half to colour it a light grey/silver colour
- 43. Use the two pieces of coloured fondant to shape a knife, similar to any kitchen knife, & place on top of the cake
- Prep Time: 15 mins
- Cook Time: 15 mins
You Might Also Like:
Comments (No Comments)

Hi! I'm Katie!
This is a test placeholder and it will be updated
Leave a Reply